Amazon S3 (Simple Storage Service) is a cloud-based object storage service that allows customers and businesses to store their data securely and at scale.
RudderStack lets you configure Amazon S3 as a destination where you can seamlessly store your event data.
Setting up Amazon S3
Follow these steps to set up your S3 bucket before adding it as a destination in RudderStack:
- Login to your Amazon AWS S3 console.
- Create a new bucket. Alternatively, you can also choose an already-existing bucket.
Permissions
There are three ways to give RudderStack the relevant permissions for writing in your bucket. You can choose any one of them based on your internal security policies.
Option 1: Creating credentials for the IAM user
This option involves creating the necessary user credentials and providing them in the S3 destination setup in RudderStack.
- Login to your Amazon AWS IAM Console.
- Create an IAM user with the programmatic access and choose a policy that has write access to your bucket. Here is a sample reference for the policy:
{ "Version": "2012-10-17", "Statement": [ { "Effect": "Allow", "Action": "s3:PutObject", "Resource": "arn:aws:s3:::YOUR_BUCKET_NAME/*" } ]}- Make a note of both access key ID and secret access key, as these credentials will be required while configuring S3 as a destination in RudderStack.
Option 2: Allow RudderStack user to write into the bucket
To allow the RudderStack user to write into your bucket, add the following JSON in your bucket policy:
{ "Version": "2012-10-17", "Statement": [ { "Effect": "Allow", "Principal": { "AWS": "arn:aws:iam::422074288268:user/s3-copy" }, "Action": ["s3:PutObject", "s3:PutObjectAcl"], "Resource": ["arn:aws:s3:::YOUR_BUCKET_NAME/*"] } ]}YOUR_BUCKET_NAME in the above JSON with your S3 bucket name.By adding the above policy, the RudderStack user arn:aws:iam::422074288268:user/s3-copy will get the permission to write into your bucket.
Option 3: For self-hosting RudderStack
If you are hosting RudderStack in your own instance and don't want to follow the above method, then you need to follow these steps:
- Create a new IAM user with programmatic access and attach the below policy:
{ "Version": "2012-10-17", "Statement": [ { "Effect": "Allow", "Action": "*", "Resource": "arn:aws:s3:::*" } ]}- Then, add the following policy to your bucket and replace
ACCOUNT_ID,USER_ARN, andBUCKET_NAMEwith the AWS account ID and the user ARN for the above-created user, and the S3 bucket name.
{ "Version": "2012-10-17", "Statement": [ { "Effect": "Allow", "Principal": { "AWS": "arn:aws:iam::ACCOUNT_ID:user/USER_ARN" }, "Action": ["s3:PutObject", "s3:PutObjectAcl"], "Resource": ["arn:aws:s3:::BUCKET_NAME/*"] } ]}- Finally, add the programmatic access credentials for the above-created IAM user to the environment of your RudderStack setup, as shown:
RUDDER_AWS_S3_COPY_USER_ACCESS_KEY_ID=<access_key_id>RUDDER_AWS_S3_COPY_USER_ACCESS_KEY=<secret_access_key>S3 permissions for warehouse destinations
If you're using your S3 bucket as an intermediary object storage for a warehouse destination, then you will need to set the following bucket permissions:
"Action": [ "s3:GetObject", "s3:PutObject", "s3:PutObjectAcl", "s3:ListBucket"]Configuring S3 destination in RudderStack
Follow these steps to set up S3 as a destination in RudderStack:
- From your RudderStack dashboard, add a source. Then, from the list of destinations, select Amazon S3.
- Assign a name to the destination and click on Continue.
Connection settings
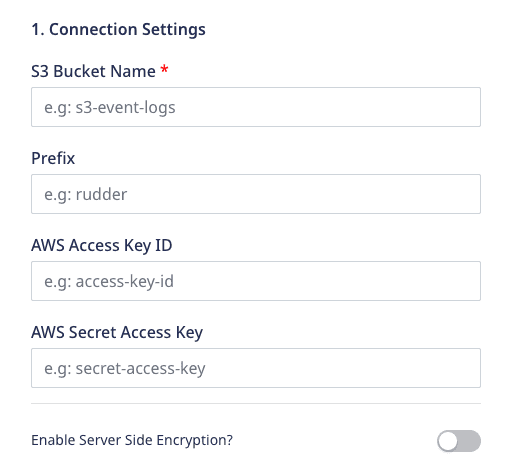
In the Connection Settings page, enter the following settings to configure the S3 destination:

- S3 Bucket Name: Enter your S3 bucket name.
- Prefix: If specified, RudderStack creates a folder in the bucket with this name and pushes all the data within that folder. For example,
s3://<bucket_name>/<prefix>/ - AWS Access Key ID: Enter the AWS access key ID associated with the IAM user with the programmatic access.
- AWS Secret Access Key: Enter the AWS secret key.
- Enable Server Side Encryption: When this setting is enabled, RudderStack adds a header
x-amz-server-side-encryptionwith the valueAES256to thePutObjectrequest when sending the data to the S3 bucket.
Encryption
Amazon S3 provides encryption at rest. The object gets encrypted while saving it to the S3 bucket and is decrypted before downloading from S3.
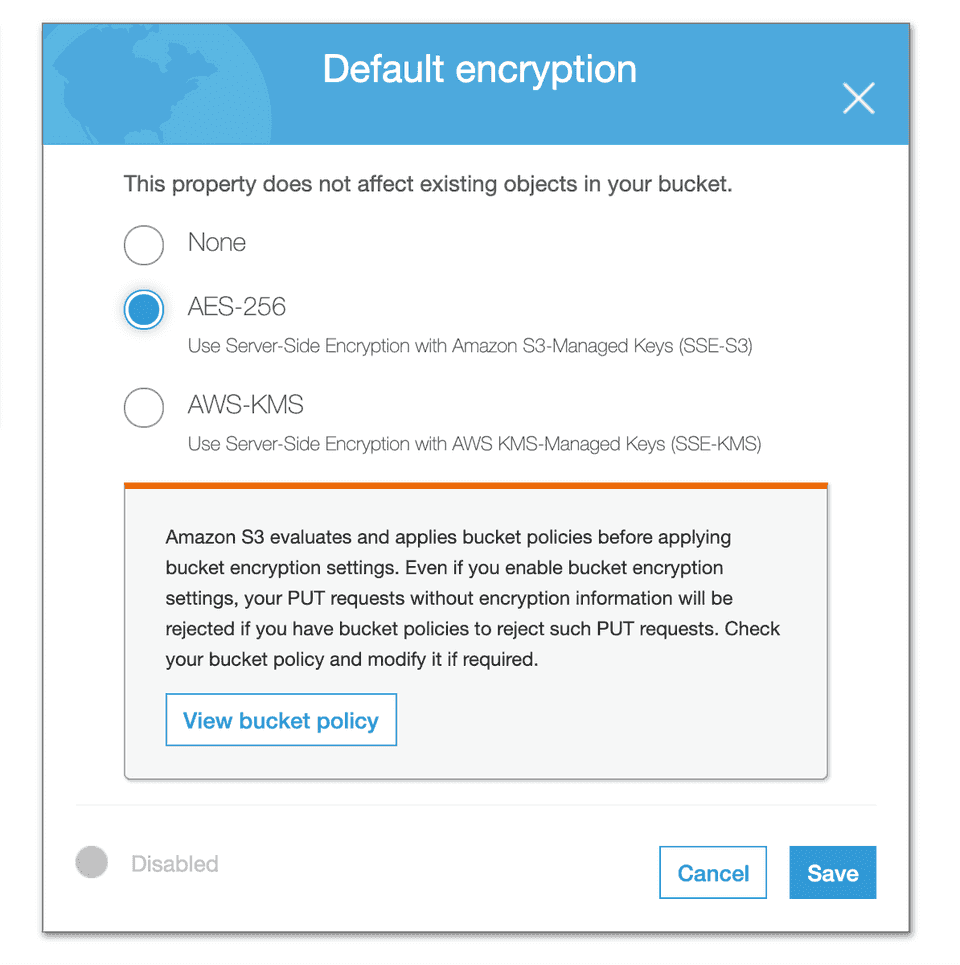
S3 provides a way to set the default encryption behavior for a bucket. You can set the default encryption on a bucket from its properties. The objects are encrypted using server-side encryption with either Amazon S3-managed keys (SSE-S3) or AWS Key Management Service (AWS KMS) customer managed keys (CMKs), as shown:

Server-side encryption using AWS KMS (SSE-KMS)
RudderStack can write to S3 buckets when the default encryption is set to AWS-KMS. The objects are encrypted using the customer managed keys (CMK) when uploaded to the bucket. A CMK can be created in your AWS Key Management Service (KMS).
Follow the steps below to enable encryption using the AWS KMS-managed keys:
- Create a new customer-managed key in AWS Key Management Services (KMS) and add your IAM user in the Key Usage Permission section. This will allow the IAM user to use the key for the cryptographic operations.
- Select the above-created CMK when you set the AWS-KMS option in the default encryption property for the bucket, as seen above.
Server-side encryption using Amazon S3-managed Keys (SSE-S3)
When the Enable Server Side Encryption is enabled in the S3 destination settings, RudderStack adds a header x-amz-server-side-encryption with the value AES256 to the PutObject request. S3 then encrypts the object with the AES256 encryption algorithm.
You can set the default encryption property to AES-256 for your bucket as seen in the Encryption section above.
S3 will then encrypt the object when it is uploaded in the bucket, irrespective of whether the Enable Server Side Encryption is enabled in the RudderStack dashboard, or the header x-amz-server-side-encryption is present.
Contact us
For queries on any of the sections covered in this guide, you can contact us or start a conversation in our Slack community.