While setting a destination in RudderStack is quite straightforward, you might encounter a scenario where you need to configure multiple instances of a destination with different configurations for specific fields. RudderStack lets you pass these configuration values via the event payload dynamically.
Simply pass the path of your event payload from which the configuration value will be fetched, along with a default value for the field, as shown below:

Supported format
To use this feature, enter the path of the payload along with a default value in the text field of a connection setting that you want to configure.
The format in which the setting should be specified is shown below:
{{event.path.config.name || "default_config_value"}}You can also use this feature to dynamically configure complex input types like field mappings, as seen in the following example:

Any value present in the path will be passed as a configuration value in the dashboard settings. If no value is present in the payload path, the default value will be used to configure the destination.
Default value format
You can set the default configuration value as per your requirement.
- To set a number as the default value, set it as a string.
- In case of a multi-word string, we recommend setting the value within double quotes, e.g.
"default value".
Use-case
Suppose you want to send your event data to different Google Analytics instances based on the source ID. In this scenario, setting a dynamic tracking ID helps you set up different Google Analytics destinations, each configured with a specific tracking ID.
Step 1: Add a transformation
To populate the configuration values from the event payload, you need to add a transformation function. A sample function is shown below:
export function transformEvent(event, metadata) { let updatedEvent = event; const met = metadata(event); if ( met && met.sourceId === "example_source_id_1" && event.message && event.message.properties ) { updatedEvent.properties.trackingId = "UA-Custom-TrackingID_1"; } else if ( met && met.sourceId === "example_source_id_2" && event.message && event.message.properties ) { updatedEvent.properties.trackingId = "UA-Custom-TrackingID_2"; } return updatedEvent;}For this transformation, the path that fetches the configuration values should be set in the dashboard settings as shown below:
{{ message.properties.trackingId || "UA-1659942401" }}Step 2: Specify the path in destination settings
Once you have added a transformation, the next step is to add a Google Analytics destination in the RudderStack dashboard.
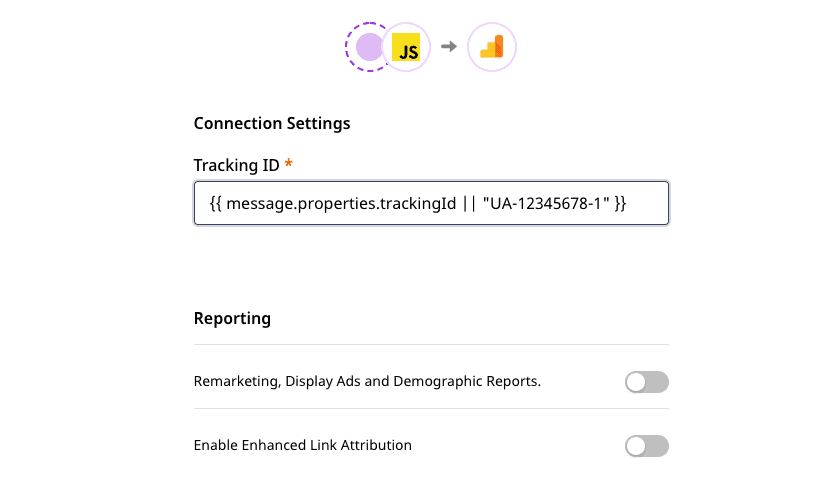
In the Connection Settings, the Tracking ID field of the destination should be configured as shown:

How it works
Consider the following event payload:
[{ "message": { "channel": "web", "context": { "traits": { "name": "John Doe" }, "app": { "build": "1.0.0", "name": "RudderStack JavaScript SDK", "namespace": "com.rudderstack.javascript", "version": "1.0.0" }, "library": { "name": "RudderStack JavaScript SDK", "version": "1.0.0" }, "userAgent": "Mozilla/5.0 (Macintosh; Intel Mac OS X 10_14_5) AppleWebKit/537.36 (KHTML, like Gecko) Chrome/77.0.3865.90 Safari/537.36", "locale": "en-US", "ip": "0.0.0.0", "os": { "name": "", "version": "" }, "screen": { "density": 2 } }, "properties": { "trackingId": "UA-1234567890", "plan": "Sample Plan", "name": "john doe" }, "type": "identify", "messageId": "84e26acc-56a5-4835-8233-591137fca468", "originalTimestamp": "2019-10-14T11:15:18.299Z", "anonymousId": "00000000000000000000000000", "userId": "123456", "integrations": { "All": true }, "sentAt": "2019-10-14T09:03:22.563Z" }, "destination": { "Config": { "trackingID": "{{ message.properties.trackingId || \"UA-1659942401\" }}", "doubleClick": true, "enhancedLinkAttribution": true, "classic": true, "ignoredReferrers": "", "serverClassic": false, "includeSearch": true, "trackCategorizedPages": true, "trackNamedPages": true, "sampleRate": "100", "siteSpeedSampleRate": "1", "setAllMappedProps": true, "enableServerSideIdentify": true, "serverSideIdentifyEventCategory": "name", "serverSideIdentifyEventAction": "action1", "anonymizeIp": true, "domain": "domain", "enhancedEcommerce": true, "nonInteraction": true, "optimize": "abc123", "sendUserId": true, "useGoogleAmpClientId": true, "web-useNativeSDK": true, "dimensions": [{ "from": "name", "to": "dimension1" }, { "from": "custom2", "to": "dimension2" } ], "metrics": [{ "from": "email", "to": "metric1" }, { "from": "trait2", "to": "metric2" } ], "resetCustomDimensionsOnPage": [{ "resetCustomDimensionsOnPage": "abc" }, { "resetCustomDimensionsOnPage": "xyz" } ], "contentGroupings": [{ "from": "plan", "to": "contentGroup1" }, { "from": "name", "to": "contentGroup2" } ] }, "Enabled": true }}]Once you specify the value for the Tracking ID field as {{ message.properties.trackingId || "UA-1659942401" }} while setting up the Google Analytics destination, for the above payload, UA-1234567890 will be passed the configuration value.
This is because Config.trackingId will be set to UA-1234567890, which is the value assigned to properties.trackingId.
In case properties.trackingId does not have any value, then Config.trackingId will be set to UA-1659942401 (the default value) and passed as the destination configuration value.
FAQ
How is this feature useful to me?
This feature is very useful if you want to configure multiple instances of the same destination with different configurations for specific fields. Refer to the use-case section above to see how you can use this feature.
How should I use this feature? What if I don't want to use it?
In the text field of a particular connection setting that you want to configure, enter the path of the payload along with a default value in the following format:
{{ event.path.config.name || "default_config_value" }}If you don't want to use this feature, you can enter the configuration setting in the dashboard as you normally would.
Can I use this feature to dynamically configure a warehouse destination?
Yes, you can. Make sure that the warehouse credentials that you use to configure the destination are applicable for the dynamic project ID/database/any other configuration values from the event payload.
Can I specify only the payload path without a default value?
We highly recommend setting a payload path along with a default value. This is because if, for some reason, the payload path does not have any value, the default value is passed as the connection setting. If both the values are absent, you will get an error.
My default value is a number starting with 0. What happens if I don't set it as a string?
If your default value is a number starting with 0, you need to set it as a string. Otherwise, the value will not be accepted and you may encounter an error.
Contact us
For more information on any of the sections in this guide, feel free to contact us or start a conversation in our Slack community.