This document explains the step-by-step process of migrating from Segment to RudderStack. It covers the necessary steps for replacing your instrumentation code and start using the RudderStack SDKs to track your events with minimal code changes.
Migrating the workspace
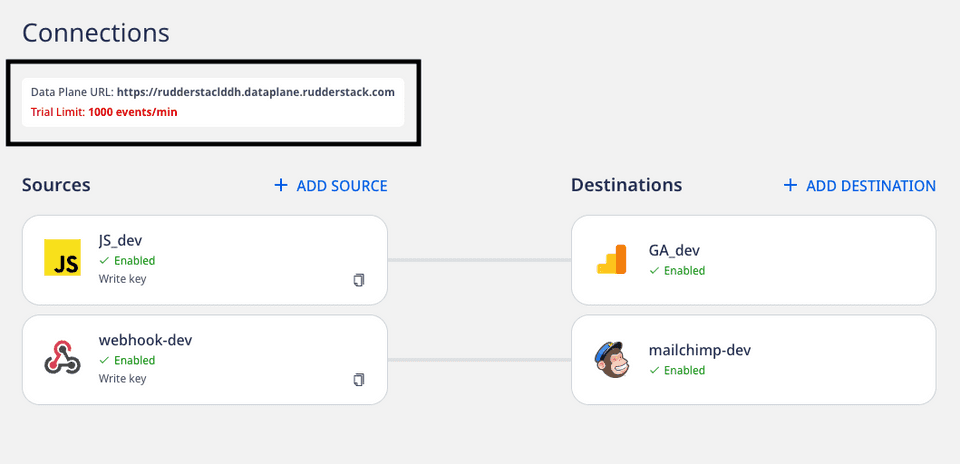
After creating a RudderStack account, you will see the following dashboard containing your data plane URL:

Similar to Segment, you will need to set up your source-destination connections in the dashboard and facilitate the event data flow.
If you need more support or want us to manage your hosting, you can contact us.
Updating the SDK implementation
Depending on the platform, follow these steps to move your existing SDK implementation to RudderStack:
- Change the dependencies in your
app/build.gradlefile add the following:repositories {mavenCentral()} - Under dependencies, add the following:implementation 'com.rudderstack.android.sdk:core:1.0.1'implementation 'com.google.code.gson:gson:2.8.6'
- Update your SDK initialization to the following snippet. Replace
WRITE_KEYandDATA_PLANE_URLwith your source write key and data plane URL obtained above.RudderClient rudderClient = RudderClient.getInstance(this,<WRITE_KEY>,new RudderConfig.Builder().withDataPlaneUrl(<DATA_PLANE_URL>).withLogLevel(RudderLogger.RudderLogLevel.DEBUG).withTrackLifecycleEvents(true).withRecordScreenViews(true).build()); - Update the use of the classes according to the following table:
Segment RudderStack AnalyticsRudderClientTraitsRudderTraitsPropertyRudderProperty
- Change the dependencies in the
Podfileof your project:pod 'Rudder' - Update your SDK initialization to the following. Replace
WRITE_KEYandDATA_PLANE_URLwith your source write key and data plane URL obtained above.RudderConfigBuilder *builder = [[RudderConfigBuilder alloc]init];[builder withDataPlaneUrl:<DATA_PLANE_URL>];[RudderClient getInstance:<WRITE_KEY> config:[builder build]];The instance of theRudderClientis available at[RudderClient sharedInstance]whereas the Segment Instance is available at[Analytics sharedAnalytics] - Update the imports from
Analytics.htoRudder.hwherever necessary - Update the use of the classes according to the table below:
Segment RudderStack AnalyticsRudderClientTraitsRudderTraitsPropertyRudderProperty
- Add the SDK to your web application:<script>rudderanalytics = window.rudderanalytics = [];var methods = ["load","page","track","identify","reset"];for (var i=0; i<methods.length; i++) {var method = methods[i];rudderanalytics[method] = function(methodName) {return function() {rudderanalytics.push([methodName, ...arguments]);}} (method)}rudderanalytics.load(<WRITE_KEY>, <DATA_PLANE_URL>);rudderanalytics.page();</script><script src="https://cdn.rudderlabs.com/v1.1/rudder-analytics.min.js"></script>For the minified version of the above script, refer to the RudderStack JavaScript SDK guide.If you are using an older version of the JavaScript SDK (v1), refer to the Version Migration Guide to migrate to v1.1.
- Update the object. RudderStack uses
rudderanalyticsas the global object library as compared to Segment'sanalyticsobject.You can use the rest of your code without any changes as the RudderStack API is fully compatible with Segment.
- Change your .NET project's Dependencies to include the
RudderAnalyticspackage via NuGet - Then, initialize the RudderStack client by running the following code snippet. Replace
WRITE_KEYandDATA_PLANE_URLwith your source write key and data plane URL obtained above.using RudderStack;RudderAnalytics.Initialize(<WRITE_KEY>,new RudderConfig(dataPlaneUrl: <DATA_PLANE_URL>));You can use the rest of your code without any changes as the RudderStack API is fully compatible with Segment.
- Install the RudderStack React Native SDK by running the following command:// npmnpm install @rudderstack/rudder-sdk-react-native --save// yarnyarn add @rudderstack/rudder-sdk-react-native// navigate to iOS folder and run pod installpod install
- Then, import the React Native SDK.import rudderClient from "@rudderstack/rudder-sdk-react-native"
- Next, change the SDK initialization as shown in the following snippet. Replace
WRITE_KEYandDATA_PLANE_URLwith your source write key and data plane URL obtained above.await rudderClient.setup(<WRITE_KEY>, {dataPlaneUrl: <DATA_PLANE_URL>,trackLifecycleEvents: true,recordScreenViews: true,}) - Update the references to the
analyticskeyword in your application code withrudderClient.
Backfilling Segment anonymous IDs
When migrating from Segment or a similar analytics tool, you might already have some anonymous traffic that has not yet been identified. When Segment and RudderStack track events for non-identified users, both assign a random UUID as an anonymousId. This ID is used to track an unknown user until they are identified. It also allows RudderStack to track user behavior, journeys, and first-touch attribution before and after the users are identified.
Capturing Segment anonymousId automatically
You can automatically capture the Segment anonymousId and set it as Rudderstack anonymousId using the JavaScript SDK's anonymousIdOptions object. When enabled, it reads the Segment anonymousId from your local storage (localStorage) or the Segment cookie and sets it accordingly.
anonymousIdOptions object, refer to the Capturing anonymousId automatically section.Contact us
For queries on any of the sections covered in this guide, you can contact us or start a conversation in our Slack community.