RudderStack's control plane manages the configuration of your sources and destinations.
The easiest way to manage these configurations is through RudderStack's self-hosted control plane. It is free, requires no setup, and has some useful features like Live Events and Transformations.
If you don't wish to sign up for RudderStack and want to self-host these configurations instead, you can use the open-source Control Plane Lite utility to set up your own control plane. You can then manage the source and destination configurations locally by exporting or importing from a JSON file.
Setting up the control plane
To set up your self-hosted control plane using the Control Plane Lite utility, follow these steps:
Make sure you have Node.js installed before setting up your self-hosted control plane.
- Clone the RudderStack Control Plane Lite repository.
- Open your terminal and navigate to the Config Generator folder. Then, run the following commands:
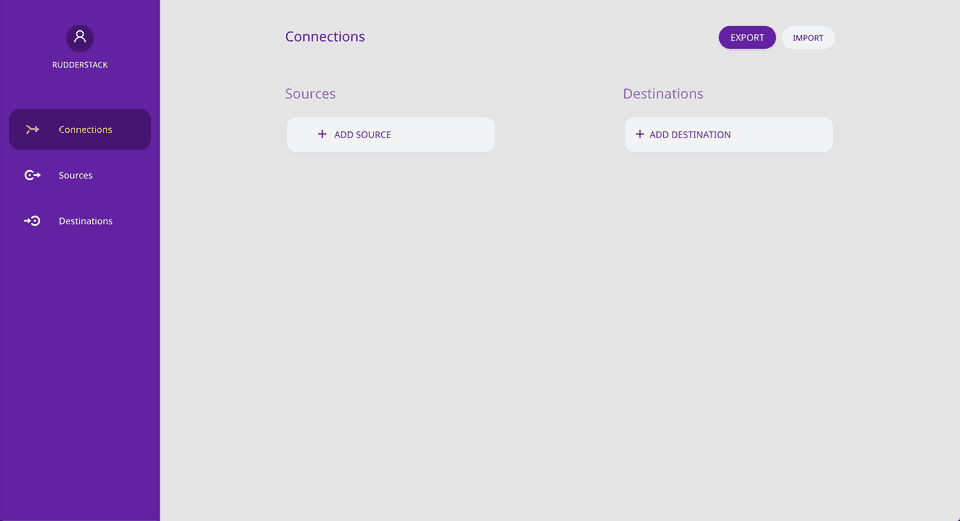
npm install npm start- Upon successful setup, you can access the dashboard at
http://localhost:3000by default.

Exporting workspace configuration
After adding the required sources and destinations in the dashboard, you can export your workspace configuration by clicking on the EXPORT button. The configuration is then exported and saved as a JSON file. This file is required to start the RudderStack server.
Starting RudderStack server with the workspace configuration file
For RudderStack to pick up the exported workspace configuration file, follow the steps for your preferred RudderStack setup.
Docker
- Download and open
rudder-docker.yml. - In the
environmentsection underbackendservice, uncomment the following lines:
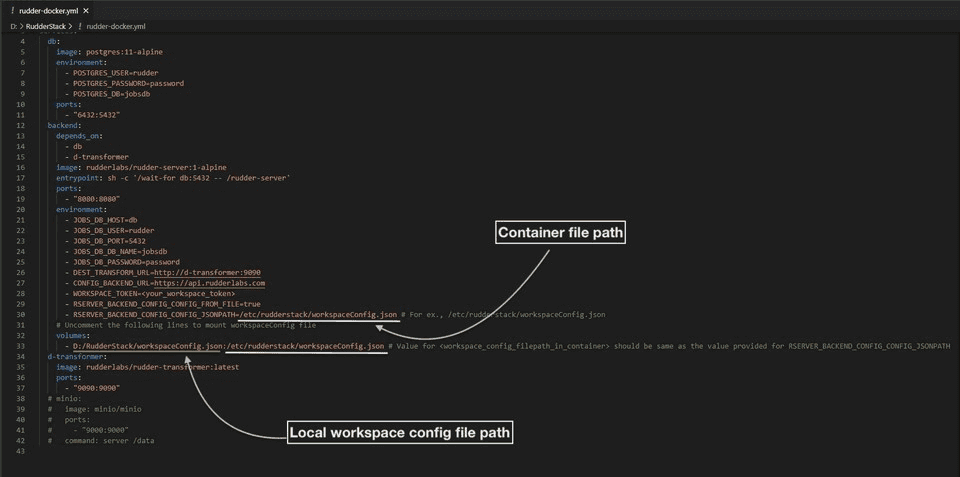
- RSERVER_BACKEND_CONFIG_CONFIG_FROM_FILE=true - RSERVER_BACKEND_CONFIG_CONFIG_JSONPATH=<workspace_config_filepath_in_container>- Then, replace
<workspace_config_filepath_in_container>in the above line with your container file path. By default, you can set it to/etc/rudderstack/workspaceConfig.json. - In the
volumessection under thebackendservice, uncomment the following line:
- <absolute_path_to_workspace_config>:<workspace_config_filepath_in_container>- Next, replace
<absolute_path_to_workspace_config>with the local path of yourworkspaceConfig.json(where your workspace configuration file is saved locally). Also, replace<workspace_config_filepath_in_container>with the container file path that you set in Step 3.
<workspace_config_filepath_in_container> should be the same as the value provided for the RSERVER_BACKEND_CONFIG_CONFIG_JSONPATH variable. Otherwise, your workspace configuration will not be loaded and you will get an error.- At this stage, your
rudder-docker.ymlshould look like the following:

- Finally, navigate to the directory where you want to install RudderStack and run the following command:
docker-compose -f rudder-docker.yml upOnce you have completed these steps above successfully, send test events to verify your installation.
Kubernetes
- Clone the repository containing the RudderStack Helm chart by running the following command:
git clone git@github.com:rudderlabs/rudderstack-helm.git- Navigate to the folder containing the Helm chart, as shown:
cd rudderstack-helm/- Open the
values.yamlfile. - Set the parameter
controlPlaneJSONtotrue. - Export the workspace configuration from the dashboard by following the steps in the Exporting workspace configuration section above. Place the exported file in the
rudderstack-helmfolder. - Finally, run the following command:
helm install my-release ./ --set backend.controlPlaneJSON=trueOnce you have completed these steps above successfully, send test events to verify your installation.
Developer machine setup
- First, set up the database in your preferred directory using the following commands:
createdb jobsdbcreateuser --superuser rudderpsql "jobsdb" -c "alter user rudder with encrypted password 'rudder'";psql "jobsdb" -c "grant all privileges on database jobsdb to rudder";- Next, clone the RudderStack server repository.
- Then, run
git submodule initandgit submodule updateto fetch therudder-transformerrepository. - Next, navigate to the rudder-transformer directory:
cd rudder-transformer- Install the dependencies using the command
npm i. Then, start the destination transformer using the following command:
node destTransformer.js- Navigate back to the main directory using the command
cd rudder-server. - Next, copy the
sample.envto the main directory, as shown:
cp config/sample.env .env- Then, go to the
configfolder and openconfig.yaml. - Under
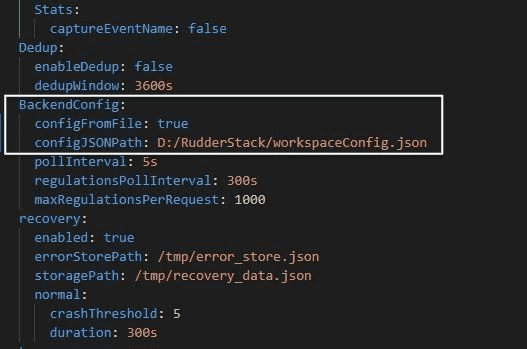
[BackendConfig], look forconfigFromFileand set it totrue. - Also, change the value of
configJSONPathto the local path of yourworkspaceConfig.json(where your workspace configuration file is saved locally), as shown:

Finally, run the RudderStack server using the following command:
go run main.go
Once you have completed these steps above successfully, send test events to verify the installation.
Using hosted control plane for device mode destinations
RudderStack's web and mobile SDKs expect the source configurations and the associated device mode destination configurations for initialization. If you are self-hosting the control plane, you will need to host these configurations on your own server such that the source configuration is available at <CONTROL_PLANE_URL>/sourceConfig.
To know more about the difference between cloud mode and device mode in RudderStack, read the RudderStack Connection Modes guide.
https://api.rudderlabs.com/sourceConfig.Control plane URL
Since the RudderStack SDKs need the source configuration and the backend/SDKs are not aware of it by default, you must serve the configuration on your web servers and point the SDKs to the same. This configuration must be available at <CONTROL_PLANE_URL>/sourceConfig. To do so, follow these steps:
- Set up your control plane using the Control Plane Lite utility.
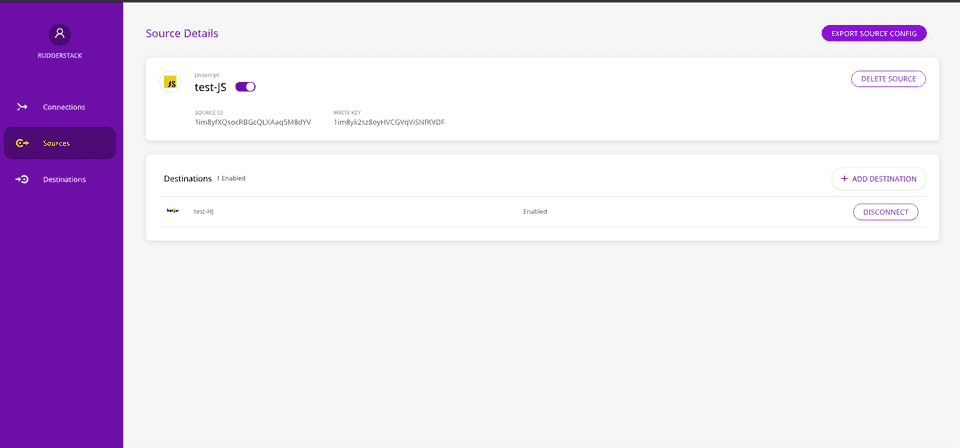
- Go to the dashboard, set up your source, and export the source configuration by clicking the EXPORT SOURCE CONFIG button, as shown:

- Host the exported file on your own server at
/sourceConfig. Provide the base URL of your server that is serving this file in the SDK initialization code snippet. For more information, refer to the following sections in the respective SDK guides:
- JavaScript SDK instructions
- Android SDK instructions
- iOS SDK instructions
- React Native SDK instructions
- Flutter SDK instructions
/sourceConfig path to the base URL provided above.The SDKs will then fetch the config from <CONTROL_PLANE_URL>/sourceConfig. A sample exported source configuration is shown below:
{ "source": { "config": {}, "id": "1im8yfXQsocRBGcQLXAaq5M8dYV", "name": "test-JS", "writeKey": "1im8yk2sz8oyHVCGVqViSNfKVDF", "enabled": true, "sourceDefinitionId": "1TW48i2bIzEl1HPf825cEznfIM8", "deleted": false, "createdAt": "Mon Oct 12 2020 16:51:54 GMT+0530 (India Standard Time)", "updatedAt": "Mon Oct 12 2020 16:51:54 GMT+0530 (India Standard Time)", "sourceDefinition": { "id": "1TW48i2bIzEl1HPf825cEznfIM8", "name": "Javascript", "displayName": "Javascript", "category": null, "createdAt": "2019-11-12T12:39:19.885Z", "updatedAt": "2020-06-18T11:54:06.114Z" }, "destinations": [ { "id": "1im927dBatOkbj1oPCV5JntGMj7", "name": "test-HJ", "enabled": true, "config": { "siteID": "dd41289" }, "destinationDefinition": { "config": { "destConfig": { "web": [ "useNativeSDK" ], "defaultConfig": [ "siteID" ] }, "secretKeys": [], "excludeKeys": [], "includeKeys": [ "siteID" ], "supportedSourceTypes": [ "web" ] }, "id": "1SxbQXdfQ2NzIdqNO3GceshF4V0", "name": "HOTJAR", "displayName": "Hotjar", "createdAt": "2019-10-31T07:49:37.450Z", "updatedAt": "2020-09-05T10:02:39.744Z" } } ] }, "metadata": { "version": "1.0.2" }}FAQ
For a self-hosted environment, how do I obtain the control plane URL?
To use the control plane URL to initialize your SDKs, follow these steps:
- Set up the control plane using the Control Plane Lite utility.
- Go to dashboard, configure the source, and export the source configuration by clicking the EXPORT SOURCE CONFIG button as shown:

- Host the exported file on your own server such that the configuration is available at
<CONTROL_PLANE_URL>/sourceConfig.
Contact us
If you across any issues while setting up your self-hosted control plane using the Control Plane Lite utility, contact us or start a conversation in our Slack community.